Pages

Tuesday, September 23, 2025

Aurora and Sunset

What do you get when you combine two lines for fabric (Aurora and Sunset by Island Batik), one Block Buster pattern (#51: 60 Degree What? by Studio 180 Design), two Studio 180 Design tools (Star 60 and Corner Beam), and background fabric (also by Island Batik)?  One beautiful project!

A light fabric, medium fabric, and dark fabric were selected from Aurora and from Sunset for this project.  Two blocks were made from just the Aurora line and two from the Sunset line.  The other blocks are a combination of the two fabric lines.  Aurora and Sunset by Island Batik work beautifully together to make this wall-hanging. 

Studio 180 Design (https://studio180design.net/blogs/news) has two new lines of fabric coming out, Aurora and Sunset, by Island Batik (Lumin Fabrics) .  They are beautiful!  The Certified Instructors for Studio 180 Design were asked to participate in a Blog Hop to introduce these two lines of fabric.  We were asked to pick a Block Buster pattern from their website.  You can find the Block Buster patterns under the Free Downloads section.  There are over 100 of them!  We were also asked to choose fabrics for the block from each line of fabric.  (I could not choose, so I had them pick a light, medium, and dark from each line for me.)  They wanted us to show how these two lines will work very well together.  So, here's the results of what I did.  

First, look at these beautiful fabrics!


The pattern I choose was #51: "60 Degree What?"  It uses the Star 60 tool in a different way than you would normally use it.  It also uses the Corner Beam tool.  Both are fun to use.  


Here are the fabrics for my project, plus the tools and pattern.  I decided to make the smallest block, which finishes at 6 1/4".  There are two other sizes for this pattern (11" and 19").  

I made the units required for this project.  Here is one of the Corner Beam units being trimmed.  The Corner Beam tool makes it so easy to get perfect units every time. Thank you, Deb Tucker, for these great tools!


Here, I am trimming the Star 60 unit.  These are from the Sunset fabrics.  


Here are two blocks from the Sunset line.  


Here are the two blocks from the Aurora line.

.          

The blocks on the left have the center square the same fabric as the Star 60 units and the blocks on the right have the center square the same fabric as the Corner Beam units.

The other blocks I made for this project have both lines of fabric in them.  It was hard to remember which fabric is from which line, Aurora or Sunset.  

Once the blocks were pieced, I started arranging them on my design board.


I arranged them by the colors of the Corner Beam units.  
Then I rearranged them according to the center squares.


Now to add sashing and corner stones.  I made mini Star 60 blocks for the corner stones.  I had four larger ones that I made from the leftover Star 60 units from the blocks.  So, those are going in the four corners.  They are made from Aurora and Sunset fabrics.  The Star 60 blocks that are used for corner stones finish at about 2" x 2 1/2".  


Here is a photo of one of those little Star 60 blocks.  The fabrics are the dark fabrics from each line.


A close up of one of the Star 60 units that I used in the corners.  The fabrics are the light fabrics from each line.


Adding the sashing pieces.  I had to add some background fabric to the outside of the side Star 60 blocks to fit in the larger Star 60 blocks in the corners.


It is ready to sew together.  


Sewn together and still on my design board.  


Outside for one last photo before quilting.  


I hope you enjoy my project using Studio 180 Design's Aurora and Sunset lines of fabric by Island Batik.  I enjoyed making it and experimenting with the Block Buster pattern #51 "60 Degree What?".

Be sure to check out the other CIs and what they have done with these lines for fabric.  They are list below.

9/18 - Studio 180 Design Intro  https://studio180design.net/blogs/news
9/22 - Tracey Stinger The Busy Bee Quilter https://busybeequilter.com
9/23 - Virginia Gibbons Fabric Thread and Stitches https://fabricthreadandstitches.net/
9/24 - Terrie Welch Quilter's Journey quiltersjourneysalem.blogspot.com
9/25 - Zhi Jones Jolly Jones Quilts https://jollyjonesquilts.blogspot.com
9/26 - Becky Malarski Sew Wise Quilter https://sewwisequilter.com/
9/29 - Kathy Tucker K&S Quilt Artistry https://kandsquilting.com/blog-1
9/30 - Tina Dillard Quilting Affection Designs https://quiltingaffection.blogspot.com/
10/1 - Diana Mann Murgaboo Quilts https://murgabooquilts.com/blogs/news
10/2 - Studio 180 Design Wrap Up  https://studio180design.net/blogs/news


Happy Quilting!
Terrie
Quilters Journey
Salem, Missouri


Wednesday, June 25, 2025

Autumn Twilight

 Autumn Twilight

What a beautiful line of fabric!


In March, at the Branson AQS Quilt Show, Raija Salomaa of Quilters Treasure Chest asked me if I would be willing to do a Blog Hop for her new line of fabric that is coming out soon.  I said I would love to!  I had no idea how beautiful this line was.  I knew it was Island Batik, and I love Island Batik!  

Raija sent these beautiful fabrics and I fell in love with them!  I asked her for 1/4 yard of each print.    

I knewI wanted to use the Star 60 tool by Studio 180 Design and use all the Star 60 Technique Sheets.  So, I got started.


Cutting and sewing.  I made as many Star 60 Blocks and Units that I could.  They didn't all go in the quilt.  Some will be in another quilt (or two).  Here is my small design wall covered with lots of units and blocks.  Ideas were flowing through my head on putting these all together.


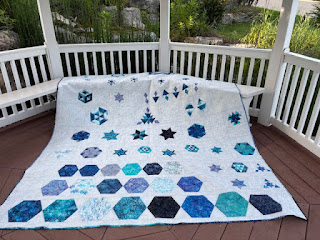
I added a light fabric from Island Batik to set these blocks together.  I wanted the blocks to look like they were floating, so I put borders around them and cut the so they were angled a little.  Then I sewed these blocks into rows, adding more of the light background fabric.  The quilt is about 81" x 86".  I custom quilted in on my Gammill.  


The quilt is about 81" x 86".  I custom quilted in on my Gammill.  


I finished it in time to take it to a quilt retreat in Branson, MO and finish hand stitching the binding.  


Just in time to take some photos around Branson.  Took some photos on the campus of College of the Ozarks (my Alma Mater), which is a beautiful campus!  A few were taken at the hotel we had our retreat.  


Here are a few close ups of the blocks in the quilt.  Oh, I decided to name it "When Hexies Dream".


Hope you enjoy the quilt.  I love the fabrics!  I really loved making this quilt and being a part of this Blog Hop.  I am so honored that Raija asked me to be a part of this.

Terrie Welch


Monday, September 23, 2024

BlockBuster #16 Peaks and Valleys

  BlockBuster #16 Peaks and Valleys

Studio 180 Design has lots of free patterns to download on their website under "Free Downloads".  They are called "BLOCKBUSTERS".  September several CIs (Certified Instructors) used BlockBuster #16 Peaks and Valleys to show on their social media.  I was able to show the fabrics I picked, but then things got really busy at the quilt shop and I didn't have time to post the Sneak Peak and the Reveal.  I did get my block finished.  I actually made three blocks and have pieces for a few more.  I made two different sizes...one 12" (finished) and two 6" (finished) blocks.  They turned out very well, as you will see later.

The fabrics are from a Moda line of fabric called Shoreline.  The blues are beautiful and the greens are also beautiful, too.  Here are the fabrics I choose with the BlockBuster pattern.


This pattern uses the Diamond Rects and the V Block tools, as well as the Sidekick & High/Low Technique Sheet, all by Studio 180 Design.

I cut my fabrics, but cut some of them incorrectly, so had to re-cut.  Finally got my fabrics cut.


Ready to sew!  I did not take any more photos until the blocks were done.  Again, the shop was busy!

This is the 12" (finished) block.


And the 6" (finished) blocks with the 12" block.  Love the 6" blocks!


Not sure what I will do with them, but I have a couple more months to make some more blocks.  

Maybe a wall-hanging.  We will see what happens.

Don't forget to check out my fellow CIs Facebook and Instagram accounts to see what they have done with this block.  

Diana Mann - Murgaboo Quilts

Tina Dillard - Quilting Affection Designs

Chris Combes - The Quilter's Nook (FB) quiltersnook (IG)

Terri Butler - Mama Said Sew, LLC

Tracey Stinger - The Busy Bee Quilter

Kathy Tucker - K&S Quilting (FB) kathy_quilts (IG)

Lynn Wheatley - Lynn Wheatley Quilter (FB) lynnwheatleyquilter (IG)

Irene Henion - Irene's Fabric Creations (FB) irenetuttlehenion (IG)

Carla Alexiuk - Quilting by the River (FB) quiltingbytheriver (IG)

Zhi Jones - jollyjonesquilts (IG)

Nikkio Mundt - Mill Street Quilt Company (FB) millstreetquiltco (IG)

Until next time!

Happy Quilting!

Terrie

Stellar Blooms Stack and Whack Tutorial

 Stack and Whack

What a name!  This is a tutorial for layering fabrics, matching the prints, and cutting them to get identical cuts.  You may have received our pattern, "Stellar Blooms" from our 2024 Ozark Hills Shop Hop or you may have purchased the pattern at one of the shops in the Ozark Hills Shop Hop after the Shop Hop.  Or, maybe you just stumbled upon this Blog and decided to read it.  Any way you got here, I'm glad you are here.  Including this in the pattern would be too much.  So, I decided to post it in a Blog post.  

For the Stellar Blooms pattern, you will need 4 repeats at least 8" for the Throw size and Twin size.  You will need 4 repeats at least 12" for the Queen size.  If the fabric you picked does not have a repeat that width, purchase 4 more repeats (more fabric).


Here is the measurement of the repeat of this fabric.


Cut your strips.  Cut 4 strips the width of the repeat of your fabric.  Find an image on your fabric that you can identify easily and find where it repeats.  Use the image to cut your fabric at the repeat.


Trim the selvage off the edges of your strips.


Pin the strips together.  Unfold your strips and press the folded edge to remove the crease OR you can cut your strips in half at the fold.  Near the long edge of the fabric strip, find a spot on your fabric that you can identify easily.  Put a pin in that spot.  Put the pin in the same spot on another strip.  Repeat with the other two strips.  If you cut your strips in half, you will have two sets of strips to pin together.


Find another spot along the long edge of the fabric and do the same thing as before.  


Repeat a few more times along the same edge of the fabric.


After I have several pins in the long edge of the fabric, I hold the fabric up and "shake" it to get the fabrics to line up.  

Sew the strips together.  Use a long basting stitch to sew the strips together.  Remove the pins after you sew the strips together.


Roll the fabric as you baste several places along the strip.  Continue to sew from the same edge of the fabric.  


You can see the basting stitches on this strip. 


Cut one edge of the strip to have a clean edge on the strips.


Cut the strips 3-1/2" wide.  Continue cutting strips across the width of the fabric.  


Make a clean cut on one edge of a strip.  Cut each strip into 3-1/2" squares. 


Remove the basting stitches from a stack of squares.  Keep the stack together until you sew them together.  I put a pin in each stack of squares.  You can also use binder clips.


Now is the time to "play".  Lay your squares out with the same corner towards the center.  Rotate each square a quarter turn so the same corner is to the center.  Repeat with another corner until you have seen all four corners toward the center.  Decide which lay out you like the best and sew the squares together. 


Repeat with each set of squares until you have the number of squares you need for the size quilt you are making.


Here are some of the blocks I have from this fabric.  


These will be used as the center of the Stellar Bloom blocks.  

Hope you enjoy this tutorial to make the "Stack and Whack" centers of the Stellar Bloom Quilt.  If you did not get a pattern, they will be available at a later date at one of the participating shops in the Ozark Hills Shop Hop.

Thank you for stopping by.  

Happy Quilting!
Terrie